
|
|
|||||||
 |
|
|
Thread Tools | Display Modes |
 08-19-2013
|
#11 |
|
Join Date: Jun 2013
Location: Toronto
Posts: 782
|
Appreciate all the input!!
1. From what I can see the cats have 3 bolts connecting them to the manifolds? Ill try without them removed I'm hoping they don't need to be. 2. Does the motor need to be raised up or does it just make things easier? Are the mounts the same or similar to an ltx? 3. What size are the Oem bolts on the manifolds ? I have a few flex head tools maybe I should grab a few more before I start :/ I'll buy one invoice me psychowette@hotmail.com One of my peeves is just getting started on a job and getting stuck in the middle which is why I like to ask before I start  . I'm debating on going to Carlisle Friday morning so I was looking to start the hesders tonight and finish before then. I just didn't want to be halfway through and need a special tool or something because I like to work during the wee hours of the night / morning and all stores are obviously closed. I don't really care to leave the car on stands for a few days because I'm waiting for my wheel barrels anyways as well as the chip to arrive. . I'm debating on going to Carlisle Friday morning so I was looking to start the hesders tonight and finish before then. I just didn't want to be halfway through and need a special tool or something because I like to work during the wee hours of the night / morning and all stores are obviously closed. I don't really care to leave the car on stands for a few days because I'm waiting for my wheel barrels anyways as well as the chip to arrive.I'm going to start anyways because I can't stand staring at the headers on the floor. Sometimes I need a kick in the butt to get started. I just can't wait to hear the car with these on with the Corsas !! I believe SW advertises these as 40+ hp? Last edited by 5ABI VT; 08-19-2013 at 08:46 PM. |

|

|
|
08-19-2013
|
#12 | |
  Join Date: Aug 2009
Location: South Dakota/California
Posts: 3,788
|
Quote:
Exhaust Manifold Gasket Dipstick Tube Seal And Maybe Stage 8 Header Bolts. LT5 Summit Racing 8905 LT5 8mm x 1.25 The underhead length is 25 mm or about .98 inches 1. Remove REAR innner wheel panels (Drivers side and Passenger side) first. ...a. Two Torx T15 to rear louvered side panel. ...b. Three Torx T27 to rear louvered side panel. ...c. Four 10mm bolts in vertical line attached to center panel. ...d. One 10 mm bolt under rear wheel panel attached to frame. ...e. Two 10 mm bolts lower rear attached to rear frame. ...f. Two 7 mm bolts along top edge drivers side of rear wheel panel attaching secondary injector module. 2. Remove 10 mm bolt that holds dipstick tube to manifold. 3. Remove Dipstick Tube. (plug dip stick tube hole temporarily) 4. Loosen exhaust connecting flanges just to the rear of the CATS (three bolts each) Use some WD40 to start with on all bolts. 5. Leave the CATS connected to the Exhaust Manifolds. 6. Remove Two Hanger bolts (Trans and Differential). Leave hangers in place. 7. Remove rear "L" Hanger on Stock Mufflers and drop mufflers a few inches supporting mufflers on blocks. 8. Finish removing 3 bolts from connecting flanges (step #4 above) and drop exhaust system to floor (drag out to rear). 9. Remove exhaust manifold tin heat isolation covers. 10. Remove Air Induction main tubes and rest of Air Induction system including pump. ...a. Associated with the Air Injection system is one vacuum line on the drivers side fender skirt above the shock tower. ...b. I eliminated the "T" and just moved the "Y" in front of "T" about 3 inches and plugged the "Y" back in where the "T" was. 11. Remove (I think 13 mm) nut on stud (stud may come out) in center lower of each Exhaust Manifold (90's - 92's only). 12. Remove exhaust manifold bolts (10mm) using various 3/8 inch socket extensions, universals, and flex head ratchet wrench. Do NOT slip wrenches on the 10mm hex head of the exhaust manifold bolts when you try to first loosen them jimming the hex in any way!!! 13. Drop Stock Exhaust Manifolds with CATS to floor and slide out to side. ...a. Leave the CATS connected to the manifolds. 14. Remove old Exhaust Manifold Gaskets and clean exhaust surfaces on block.  I use the wobble extensions on almost everything. The wobble extensions are in first picture and flex ratchet combination wrenches in second picture.   You will notice what allows the wobble. A 3/8 inch universal in the second picture.   There are all sorts of socket combinations you can get but these four tools/tool sets will get er done assuming you have a good 3/8 inch and 1/4 inch socket wrench and set of metric sockets. The BIG problem in removing the exhaust manifold is getting wrenches in such a small space. I actually use 1/4 inch socket, 1/4 inch socket extensions, 1/4 inch socket wrench, and 1/4 inch universal as the 1/4 inch are much easier to work in tight areas. When you get to installing Headers....I sometimes use two universals and two extensions with one 1/4 inch ratchet wrench with Stage 8 Header bolts (it actually works). Post 87 - Installing Headers and Exhaust Post 45 - Exhaust System Replace with Headers Now if you drop stuff....here is the tool. A 16 inch straight Hemostat (Ebay has many). On the Ebay Search....just type in Hemostat and the length you would like and also type in Curved or Straight (Hemostat 16 straight for this one). The beauty in addition to being sleek to reach tight spaces is that it can be locked (ratched locked) once you get hold of what you dropped.  Particularily useful for Stainless steel and Aluminum Nuts, Bolts and Washers.
__________________
Left Clickable links -Solutions- LT5 Modifications/Rebuild Tricks Low Mileage ZR-1 Restoration 1990 Corvette (L98) Modifications LT5 Eliminated Systems LT5 Added Systems LT5/ZR-1 Fluids 1995 LT5 SPECIFIC TOP END REBUILD TRICKS Last edited by Dynomite; 08-21-2013 at 08:58 PM. |
|
|
|
|
|
08-19-2013
|
#13 |
|
Join Date: Jun 2013
Location: Toronto
Posts: 782
|
Thank you so much
the exhaust is easy I just did the corsa , beam plates and hurst shifter about a week ago. I will get started and pickup some swivel tools tomorrow on the way from work and stop tonight as soon as I get stuck with what I have.Here's a photo of the Manifolds I'm talking about the bolts on the engine side of the cats. I'd imagine they're probably rusted together by now.. But doesn't sound like they'll need to come off. 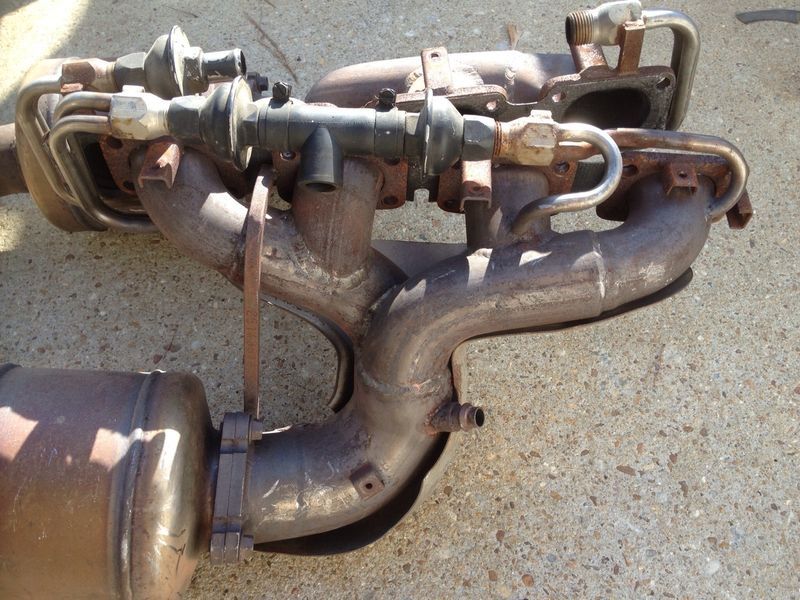
|
|
|
|
|
08-19-2013
|
#14 | |
|
Join Date: Aug 2009
Location: South Dakota/California
Posts: 3,788
|
Quote:
You are typing faster than me  Leave that together. as I assume there are three bolts on other end of CATS between CATS and exhaust pipes. You do not need swivel tools. Just a couple of 3/8 and 1/4 universals along with extensions (for this I like wobble extensions).
Last edited by Dynomite; 08-20-2013 at 02:51 AM. |
|
|
|
|
|
08-20-2013
|
#15 |
|
Join Date: Jun 2013
Location: Toronto
Posts: 782
|
Ok perfect very much appreciated. About to get started putting the car up on stands. i need it nice and high anyways I need to polish up the corsa pipes some more while Im under there and make one more go on the drain plug on the zf.
One more question.. the inner fenders.. there are 3 sections do I need to remove the middle one or the rear ones too? Must admit after staring at the headers on my 93 non -z this looks a little intimidating  I cant even see the manifolds all the way under there I cant even see the manifolds all the way under there |
|
|
|
|
08-20-2013
|
#16 | |
 Join Date: Oct 2004
Posts: 1,889
|
Quote:
|
|
|
|
|
|
08-20-2013
|
#17 | |
|
Join Date: Aug 2009
Location: South Dakota/California
Posts: 3,788
|
Quote:
Last edited by Dynomite; 08-20-2013 at 04:05 AM. |
|
|
|
|
|
08-20-2013
|
#18 |
|
Join Date: Jun 2013
Location: Toronto
Posts: 782
|
Ok time to pass out I have to be up at 6! Got te car ip in the air and gave it one more try on the drain plug after drivinh around for a while to get the feans warm in hopes of helping the drain loosen.. torque wrench clicked at 100 foot -lbs and then started to turn .. plug is officially rounded. The fill plug I already loosened and topped up when I did the shifter (for some odd reason I though I remembered the instructions said to remove the speedo gear and plug to make room O_o) and spilled some fluid when I popped that out. From now on I think jacking the car up on the front and pulling the speedo may be the best way to get fluid out.. At least until I can take it to a shoppe to get removed. Need to source a new plug first.
On to the headers.... Got the drivers side started. Traction control unit moved out and most of the air system hoses now removed. I got the heat shield completely loose but can't figure out how to get it out.. Top or bottom? There's another shield over the cat I'm guessing I may need to remove that. Tried going down just because pulling it up might scratch the valve covers and I don't want to do that. Peeking around in there all the bolts on the drivers side manifold look pretty accessible. Pulled the passenger side middle fender well section out and looks like the rear section does need to come out.. Not much visible on that side looks pretty scary Now that I've started tomorrow I'm hoping for an early start and to have both sides off before I call it a night. We shall see! Thx very much for all the input so far Where I'm at now..  Shield doesn't Seem to want to come out ! :/ 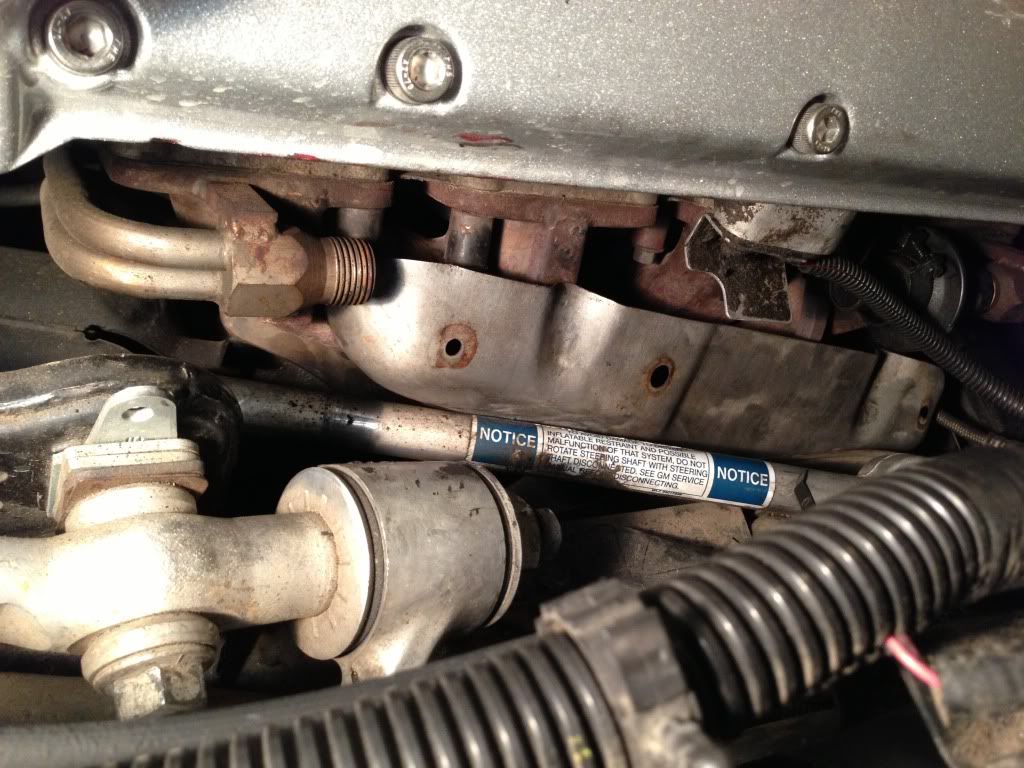
|
|
|
|
|
08-20-2013
|
#19 |
|
Join Date: Jun 2013
Location: Toronto
Posts: 782
|
Btw in the picture above this post.. Under the third valve cover bolt.. What is that plug/sensor for?
|
|
|
|
|
08-20-2013
|
#20 | |||
|
Join Date: Aug 2009
Location: South Dakota/California
Posts: 3,788
|
Quote:
Do NOT remove Camshaft Position Sensor...  Quote:
Does that mean you stripped the hex? Oh crap Can you get a vice grip around outside of threads since you need a new plug now anyway? Wait...that will not work since you already had 100 ft lbs on it. Chisel and Hammer or if that does not work at all....time to drill it out. Start with smaller drill bit to drain the oil. Then drill bit size of hex hole in plug. Then a larger drill bit but not any larger than threads on trans (actually a bit small than that). Then clean out remaining parts of plug without touching internal plug threads of Transmisison. Quote:
On that Manifold Heat shield....hmmmmm I got mine out on a 90' easily tugging at it as it is only tin. Maybe you have to loosen the engine mount like Mike100 suggests in your case to gain some space. DO NOT strip those 10 mm Exhaust Manifold Bolt Heads!!!! No Turning Back Now  Also...when you are at it......put that BIG wire harnes that goes over A-Arm on drivers side UNDER A-Arm (just remove A-Arm bolts and slip it under).
__________________
Left Clickable links -Solutions- LT5 Modifications/Rebuild Tricks Low Mileage ZR-1 Restoration 1990 Corvette (L98) Modifications LT5 Eliminated Systems LT5 Added Systems LT5/ZR-1 Fluids 1995 LT5 SPECIFIC TOP END REBUILD TRICKS Last edited by Dynomite; 08-20-2013 at 09:55 AM. |
|||
|
|
|
|
|
|


 Linear Mode

