
|
 08-28-2011
|
#131 |
|
Join Date: Apr 2009
Location: Prather, CA
Posts: 809
|
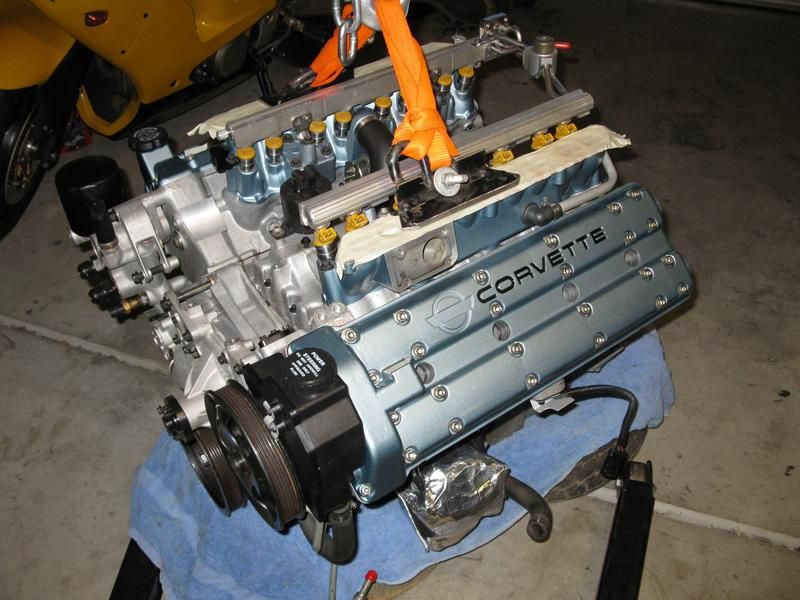
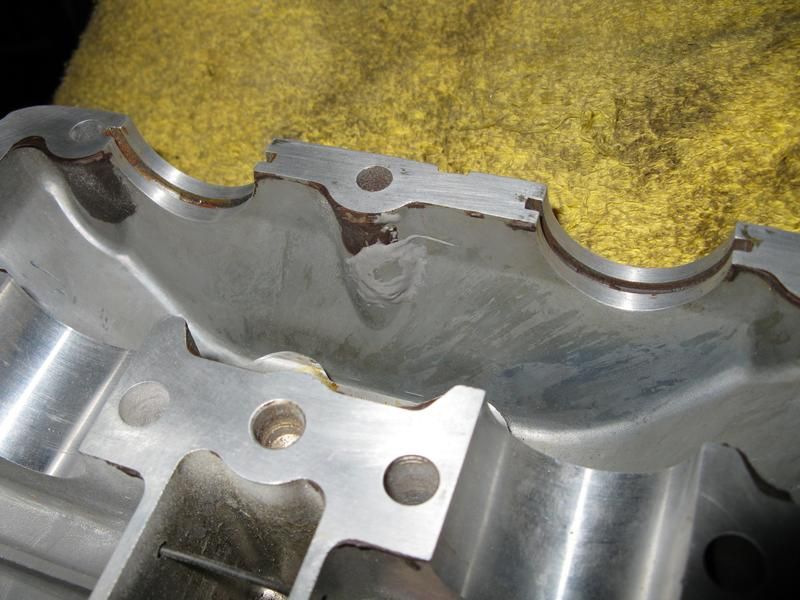 With the repairs done, I sanded everything down and then painted them. I wanted a more of a unique color for my LT5 that I hadn't seen done before so I picked a color of VHT paint called "Titanium Silver Blue". It is a little bit similar to the color steel blue, but a different shade. I did the lettering by hand with a small paint brush right after I finished laying down the color coats. I also put on a red "ZR-1" script sticker on the air horn on top of the color coats. I then laid down several coats of clear coat on all the pieces. It actually turned out really nice for being just a home paint job out of aerosol cans. I didn't take any pictures of the actual sanding or painting process, but you will see the finished top end items in the rest of the pictures. With the painting done, it was time for the cam covers to go on. I used Loctite 518 for the covers and 565 for the end plugs. It is very important to follow the tightening sequence shown in the manual and to repeat that 3 times like it says. 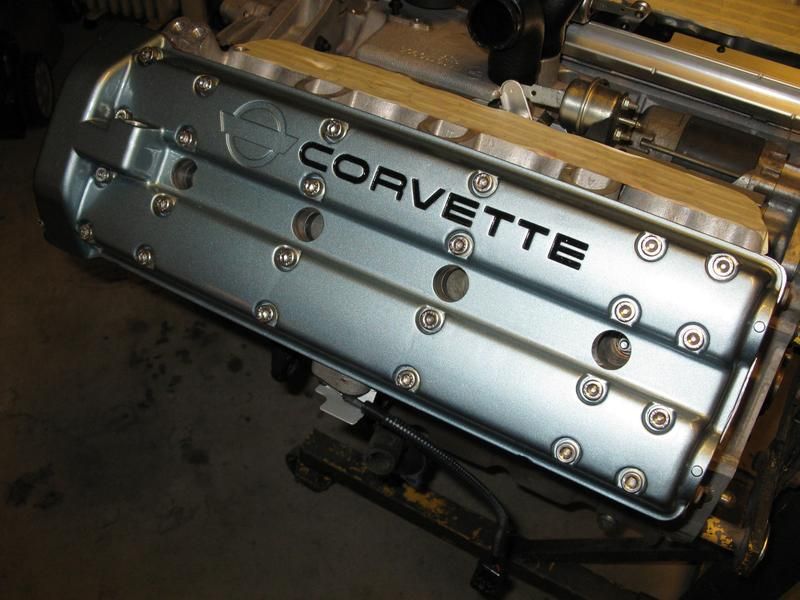 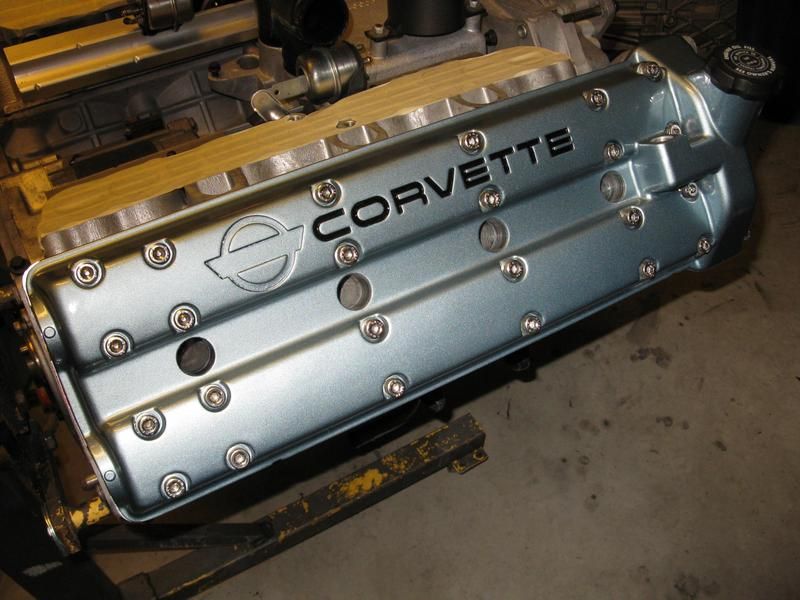 Here is where I got a little ahead of myself with regards to how many things to put back on the engine before putting it in the car. After two years, it is easy to forget stuff like that. So, I put on the injector headers (you can also see the oil filter, it is a Fram TG3985 that I painted semi-gloss black)... 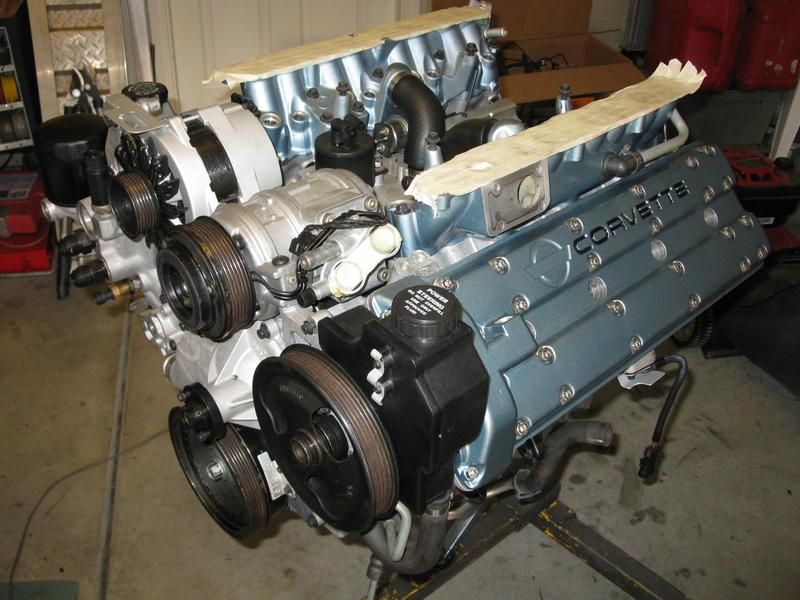 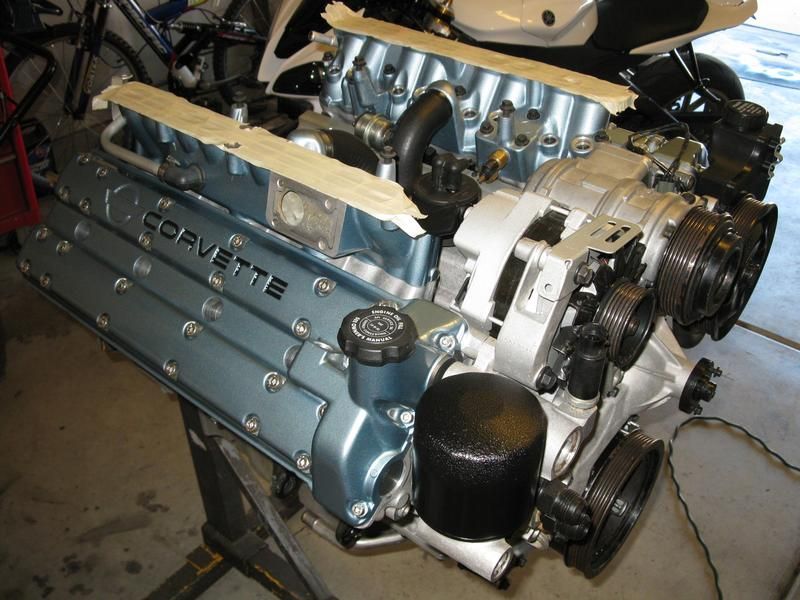 And the fuel rails... 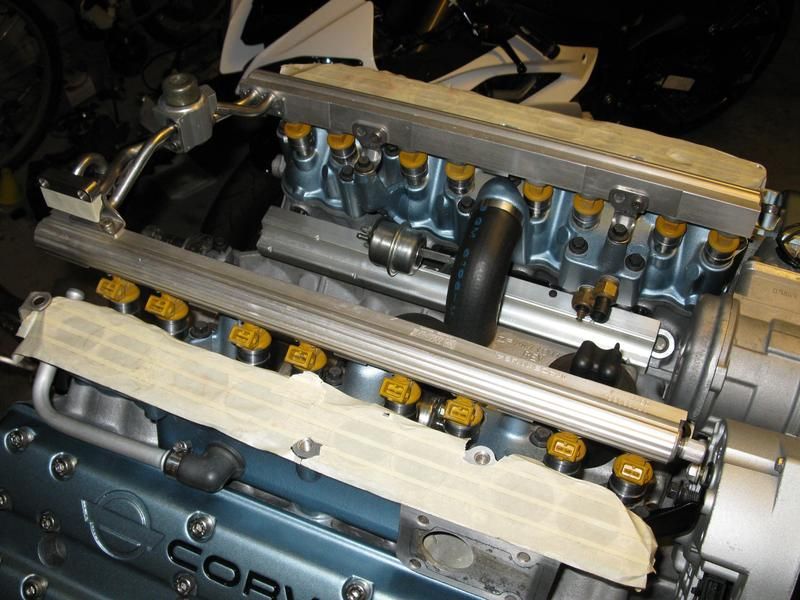
__________________
[IMG]http://i13.photobucket.com/albums/a292/bdw18_123/_zr1netforumsigphoto.jpg[/IMG][B] 1990 Corvette ZR-1 [/B][I] White/Flame Red, #2299, mostly stock, 144K miles.[/I] -Cams timed to the '93-'95 405HP LT5 stock timing. -IAT sensor relocated to below front bumper. -Haibeck hoops installed in airduct. -OBX cat-back exhaust. [COLOR=DarkRed][B](SOLD - December 2012 [/B][/COLOR][COLOR=DarkRed][B]:hello:)[/B][/COLOR] 1993 Corvette Coupe Black/Black, 6-speed (SOLD - October 2009 :hello:) Last edited by bdw18_123; 08-28-2011 at 09:39 PM. |

|

|
|
08-28-2011
|
#132 |
|
Join Date: Apr 2009
Location: Prather, CA
Posts: 809
|
At this point, I put on the lifting straps and took the engine off the stand and set it down on some small, old golfcart tires covered with a towel (with the lift strap still attached to the lift) to be able to get to the back of the engine.
 Got the old rear main seal out and installed the new seal (I found that the top of the old liner I removed was the perfect size for driving the new seal in) and then installed the rear main seal housing assembly with new gasket 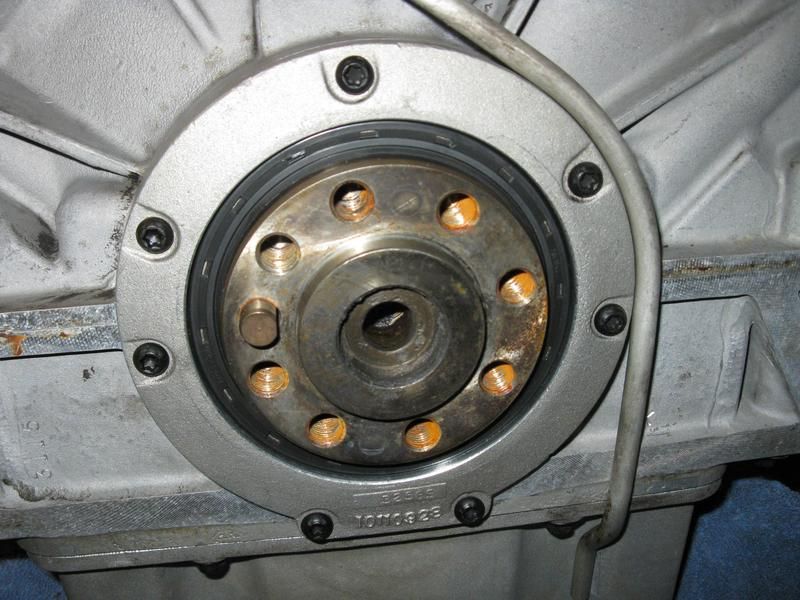 Installed the DM flywheel and torqued the bolts to spec. The DM flywheel looks like it doesn't have very many miles on it, I can still see some of the machine marks through the clutch wear marks. Looks like the entire flywheel and clutch assembly was replaced not long before I got the car from the PO. 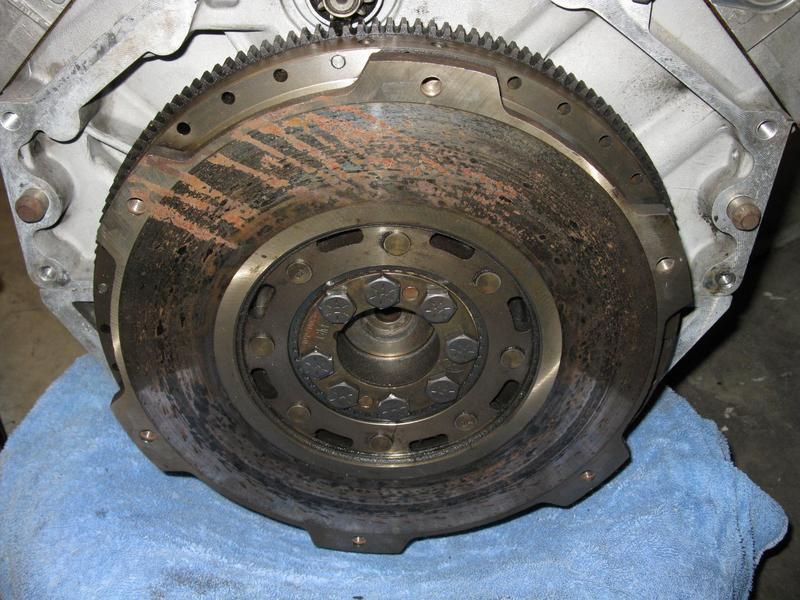 So then I was ready to proceed to try to put the engine back in the car ('try' being the operative word here 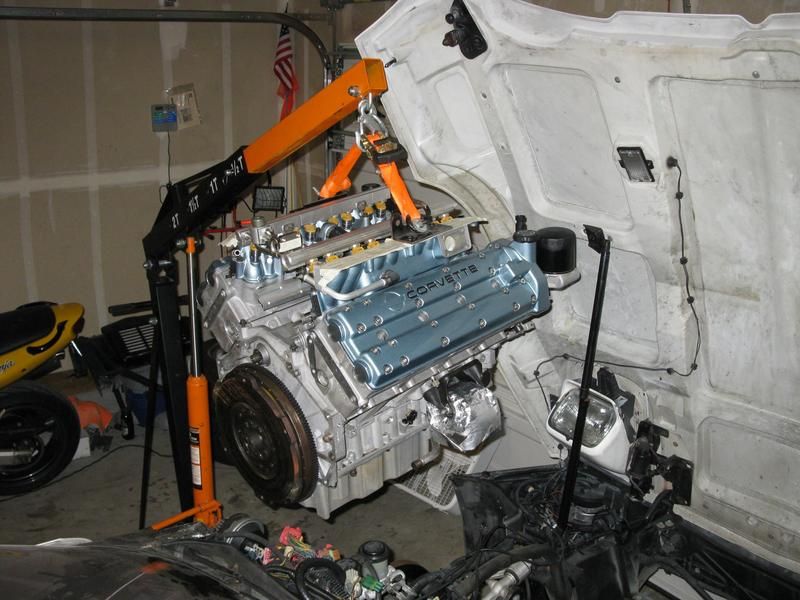
__________________
[IMG]http://i13.photobucket.com/albums/a292/bdw18_123/_zr1netforumsigphoto.jpg[/IMG][B] 1990 Corvette ZR-1 [/B][I] White/Flame Red, #2299, mostly stock, 144K miles.[/I] -Cams timed to the '93-'95 405HP LT5 stock timing. -IAT sensor relocated to below front bumper. -Haibeck hoops installed in airduct. -OBX cat-back exhaust. [COLOR=DarkRed][B](SOLD - December 2012 [/B][/COLOR][COLOR=DarkRed][B]:hello:)[/B][/COLOR] 1993 Corvette Coupe Black/Black, 6-speed (SOLD - October 2009 :hello:) |
|
|
|
|
08-28-2011
|
#133 |
|
Join Date: Apr 2009
Location: Prather, CA
Posts: 809
|
Only to find out that it was not going to fit in that configuration (I had the harmonic balancer already installed at this point, no way was I going to try to put that thing on with the engine in the car).
So back on the tires it went and I removed the fuel rails, thinking that would do the trick. 2nd attempt at stabbing the engine in, nope, still no go. I removed the IH's next, I thought for sure that would do the trick, because if not, I was running out of options. I can see why GM bottom loads these things, holy crap, what a tight fit! My LT1 engine was way easier to put in from the top by comparison (I didn't even have to remove the ZF6 from that car to get the engine in/out) By this time I was looking like this -  & this - & this - Nope, still the damn thing wouldn't fit in (though it was getting closer to fitting in), that stupid balancer still needed another 1/4" before clearing that cross-beam. It was hot in the garage, I was tired and as you can imagine, really, really not happy at that point. I was getting really close to throwing the towel in and forgetting this damn car for awhile. As I was standing there, trying to figure out what to do next, I noticed that the wiper motor was sticking out in the way of the driver's side head and preventing the engine from going back any further. I didn't have much hope at that point, but I figured, "what the heck, I'll try removing the wiper motor. If that doesn't work, I don't know what I'm gonna do." So, I got that removed, tried move the engine into place again and VOILA! to my utter relief, the balancer FINALLY cleared that stupid cross-brace (really GM, you couldn't have mounted that damn thing even 1-inch farther forward?!) & the LT5 slid into place onto the mount pads on the frame. So, the secret to getting an LT5 top loaded with the harmonic balancer installed is to not have anything installed on the engine from the IH's and up and to have the windshield wiper motor removed. Bell housing and transmission also must be removed. 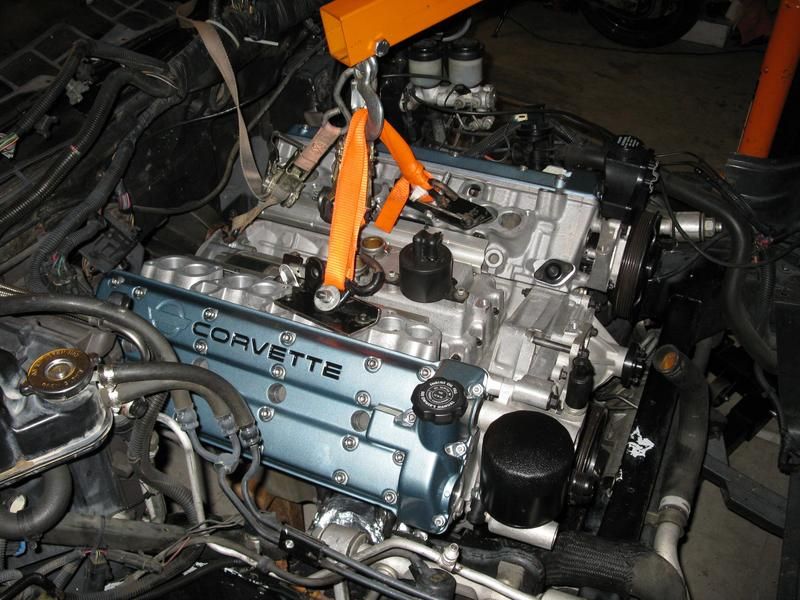 Wow, what an ordeal that was! With that major issue solved, I decided to move on to getting the stuff under the car back in (exhaust manifolds, ZF6, driveline, c-beam, etc). I cut a piece of wood a certain length and used that to hold up the back of the engine. Exhaust manifolds back in (couldn't get a very good pic with them installed). 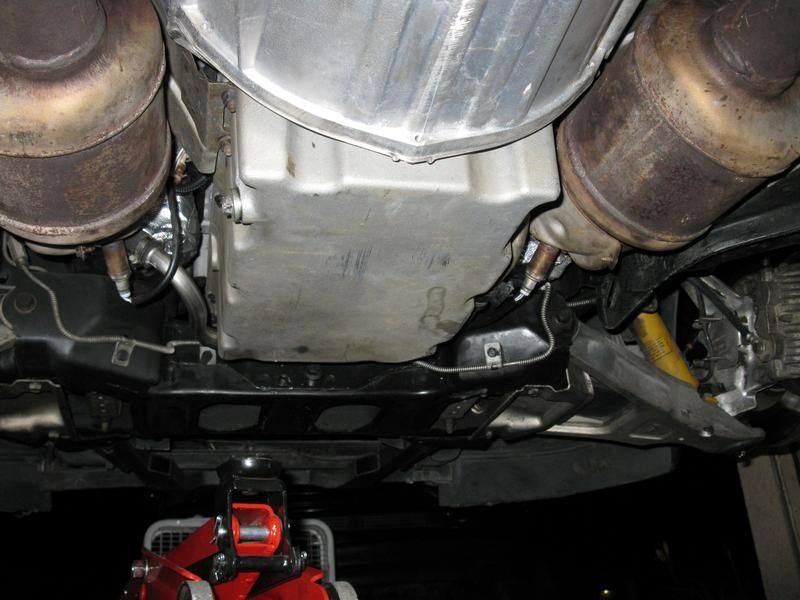 Clutch disc and pressure plate went on next. Lined up the yellow indicator marks on the DM flywheel and pressure plate and with the clutch alignment tool in place, bolted down the pressure plate following the procedure & sequence in the manual. I then went to put on the bellhousing. At first I thought I F'd up again; it looked like it couldn't go on with the exhaust manifolds installed. But if you remove the little bolt/stud on the side that holds the passenger side cat heat shield to the engine and turn the bellhousing just right when installing it, it will go on. Torqued the bellhousing bolts to spec. Sorry, no pics of any of that part. I was then ready to get the transmission in, which turned out to be a bit of an ordeal itself. The ZF6 is no lightweight, that's for sure! I used a low-profile atv/motorcycle jack and found that the input shaft has to go into the bell housing before the shifter, or the shifter won't clear the back of the shifter hole in the body. Then I lifted the ZF6 into place, while at the same time, guiding the input shaft into the clutch and the shifter up through the hole in the body. Then some wiggling and jiggling of the transmission and it slid into place. Torqued the ZF6 bolts to spec. 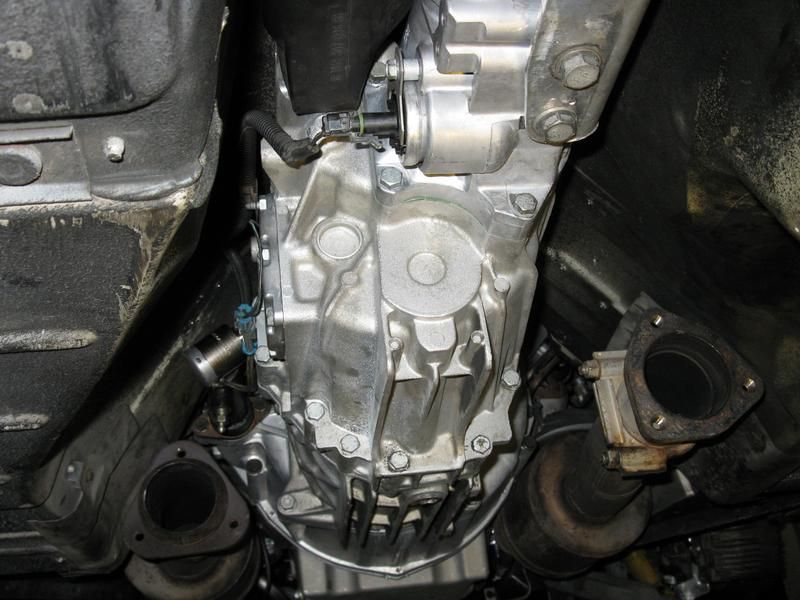
__________________
[IMG]http://i13.photobucket.com/albums/a292/bdw18_123/_zr1netforumsigphoto.jpg[/IMG][B] 1990 Corvette ZR-1 [/B][I] White/Flame Red, #2299, mostly stock, 144K miles.[/I] -Cams timed to the '93-'95 405HP LT5 stock timing. -IAT sensor relocated to below front bumper. -Haibeck hoops installed in airduct. -OBX cat-back exhaust. [COLOR=DarkRed][B](SOLD - December 2012 [/B][/COLOR][COLOR=DarkRed][B]:hello:)[/B][/COLOR] 1993 Corvette Coupe Black/Black, 6-speed (SOLD - October 2009 :hello:) Last edited by bdw18_123; 08-28-2011 at 09:31 PM. |
|
|
|
|
08-28-2011
|
#134 |
|
Join Date: Apr 2009
Location: Prather, CA
Posts: 809
|
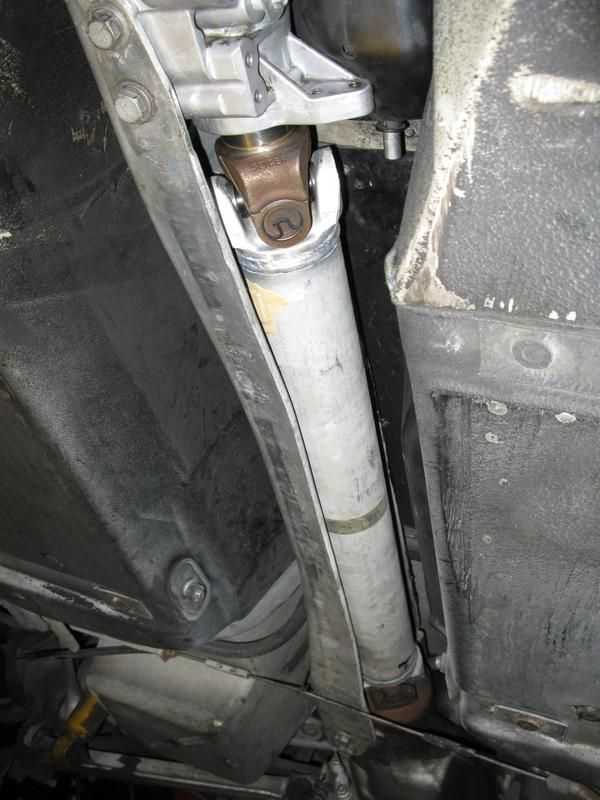
C-beam and driveline installed.
 Exhaust system installed. I painted the mufflers and tips silver, so they would at least look decent. 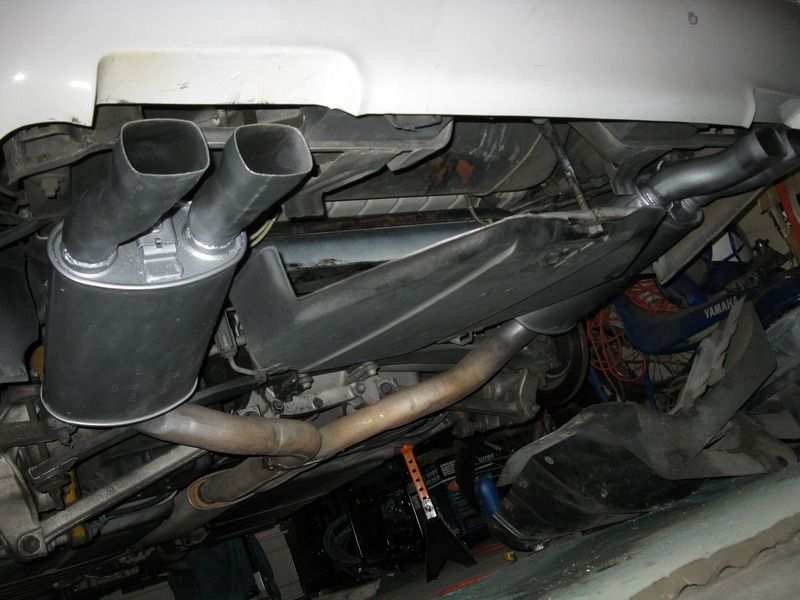 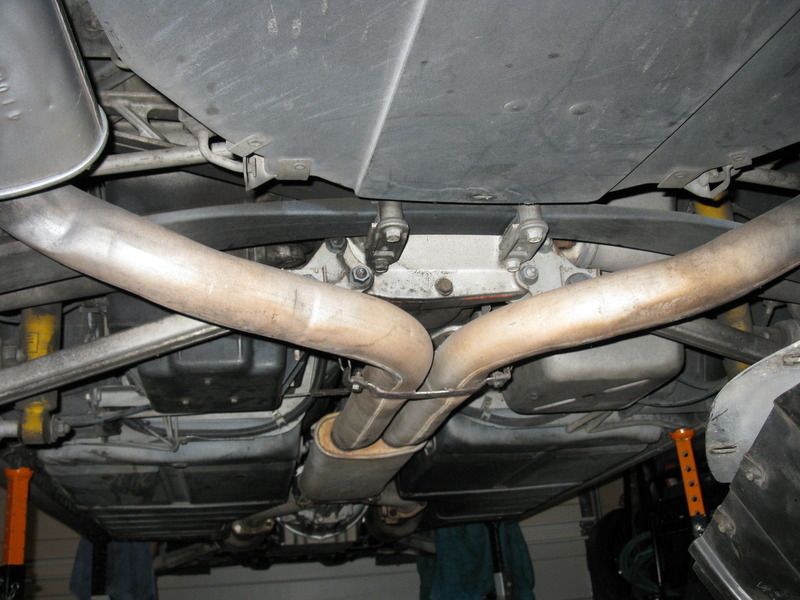 With the underside pretty much done (other than the "K"-members/engine mount bolts), I moved back to the engine compartment. Injector headers & fuel rails reinstalled. 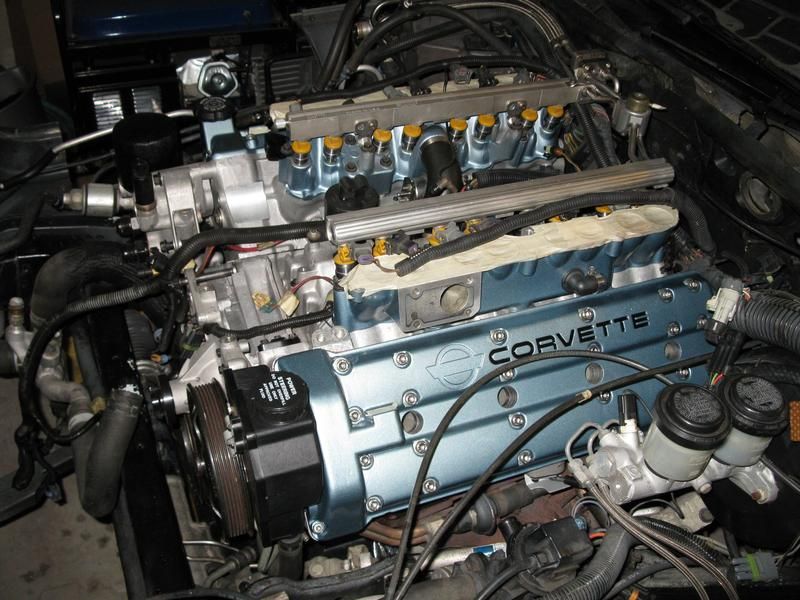 Coil pack assembly, spark plugs and plug wires routed & installed. 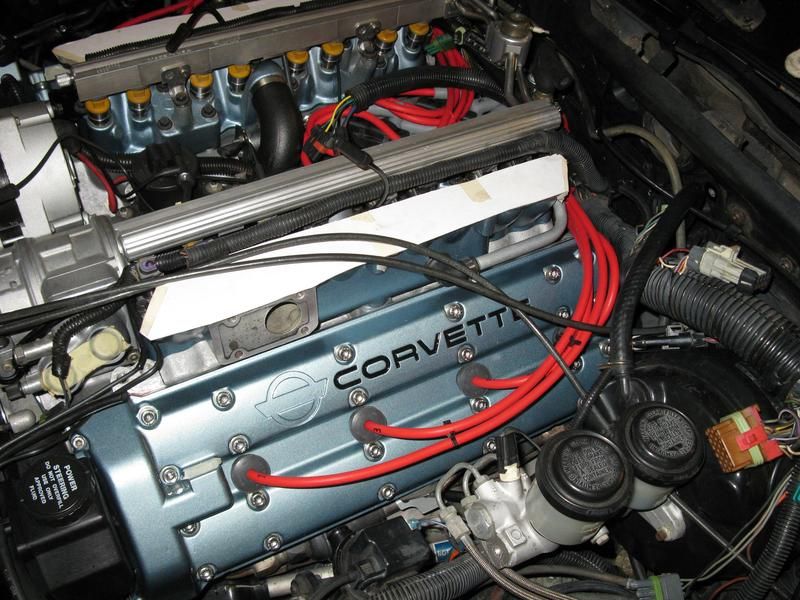 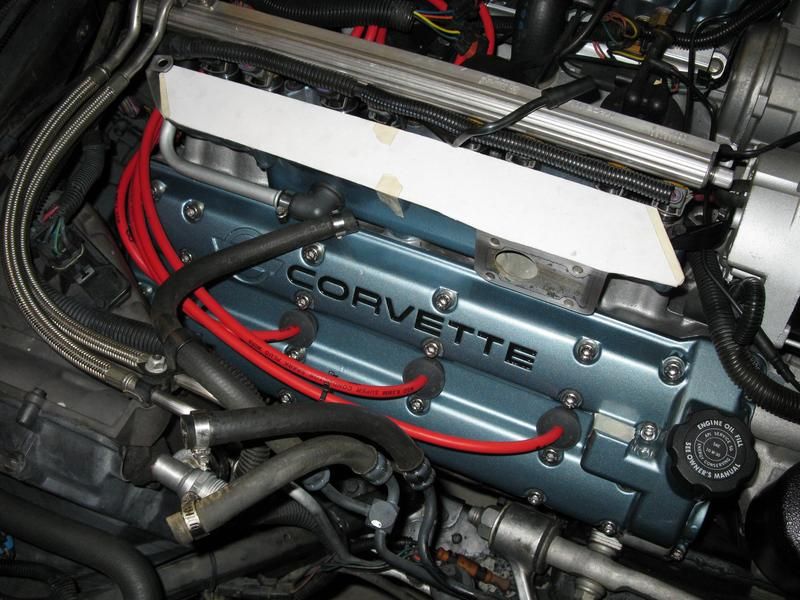
__________________
[IMG]http://i13.photobucket.com/albums/a292/bdw18_123/_zr1netforumsigphoto.jpg[/IMG][B] 1990 Corvette ZR-1 [/B][I] White/Flame Red, #2299, mostly stock, 144K miles.[/I] -Cams timed to the '93-'95 405HP LT5 stock timing. -IAT sensor relocated to below front bumper. -Haibeck hoops installed in airduct. -OBX cat-back exhaust. [COLOR=DarkRed][B](SOLD - December 2012 [/B][/COLOR][COLOR=DarkRed][B]:hello:)[/B][/COLOR] 1993 Corvette Coupe Black/Black, 6-speed (SOLD - October 2009 :hello:) Last edited by bdw18_123; 08-28-2011 at 09:31 PM. |
|
|
|
|
08-28-2011
|
#135 |
|
Join Date: Apr 2009
Location: Prather, CA
Posts: 809
|
A/C compressor, alternator and all the other pulleys installed, belt installed at this point also. Under-plenum vacuum system rebuilt. I had to replace both check valves and the secondary actuator solenoid, as they all leaked. I tested my vacuum pump, it seems to still be in functional condition.
I found this post by Kurt White, where he said to order GM part #:1997225 as, according to him, that is the closest thing to the OEM #1997222 secondary solenoid available: http://www.zr1.net/forum/showpost.ph...2&postcount=16 It is essentially the same thing, just the bracket is different. It is also the '90 style solenoid with the flat filter, but would work on other years too. I transferred the old bracket to the new soleniod, but I put the new filter on the old bracket. Similar to what is described in this post (except for the replacement part number described, that isn't the one I ordered, but apparently, it will work also): http://www.zr1.net/forum/showpost.ph...0&postcount=10 I ordered mine from Autozone, here: http://www.autozone.com/autozone/par...h&fromType=oem 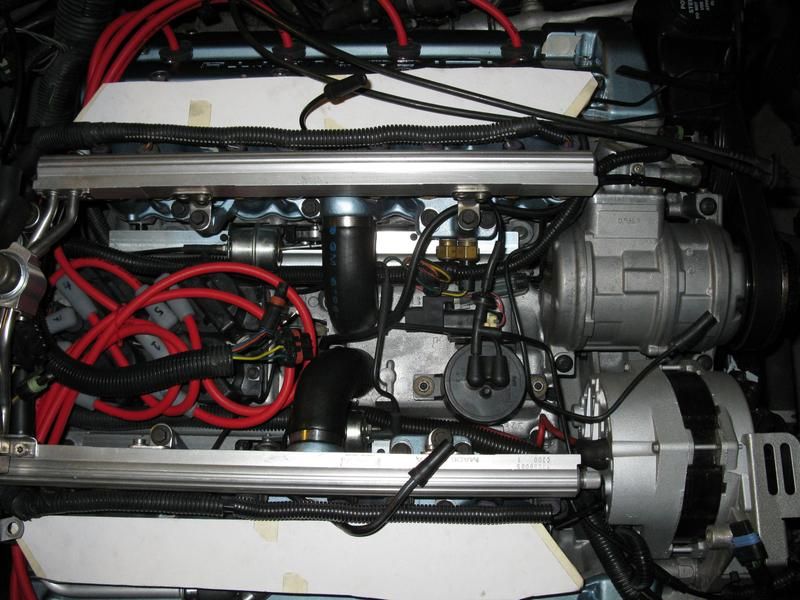 Radiator and all coolant hoses/pipe installed. I installed the correct thermostat from Jerry with the notches. I found an incorrect one installed that didn't have the notches. I also installed all of the A/C lines along with a new accumulator and a new variable orifice valve to replace the stock fixed R12 orifice valve, as I am converting my system to R134a refrigerant. A/C evaporator, oil cooler, shroud, fans & air filter assembly also installed. 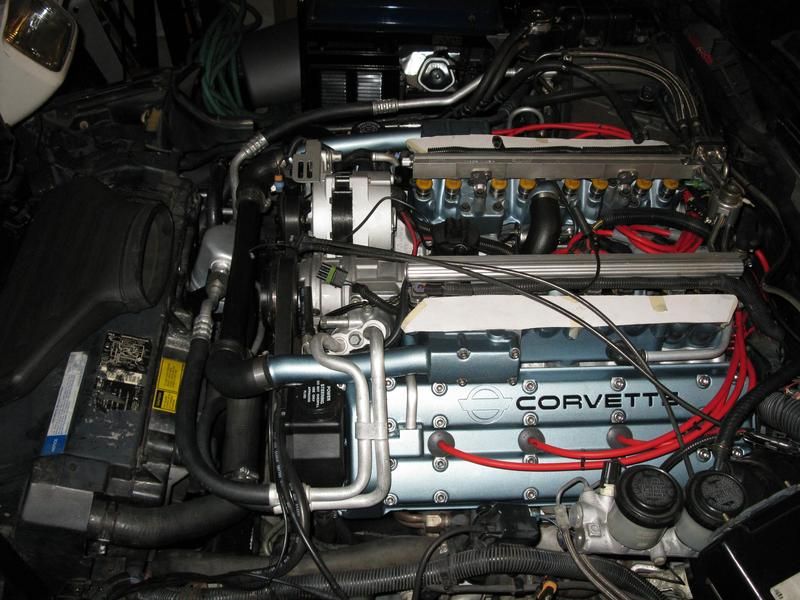 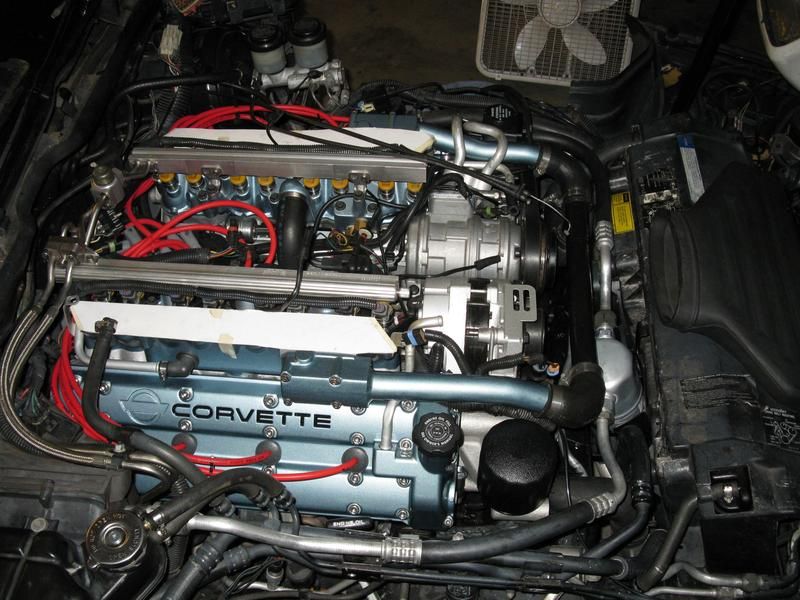 For the oil cooler lines, I took them to a local place that makes hydraulic lines. They cut the old lines off and fabbed up some new ones and attached them using #10 AN fittings at the oil filter adapter side. I also had to get some new adapter fittings for the oil filter adapter (3/4" pipe thread to #10 AN male fitting), as the large #12 AN fittings that the earlier Z's have are unnecessary. The cost? Much cheaper than the usual $160-180 or so that replacement oil cooler lines usually cost! 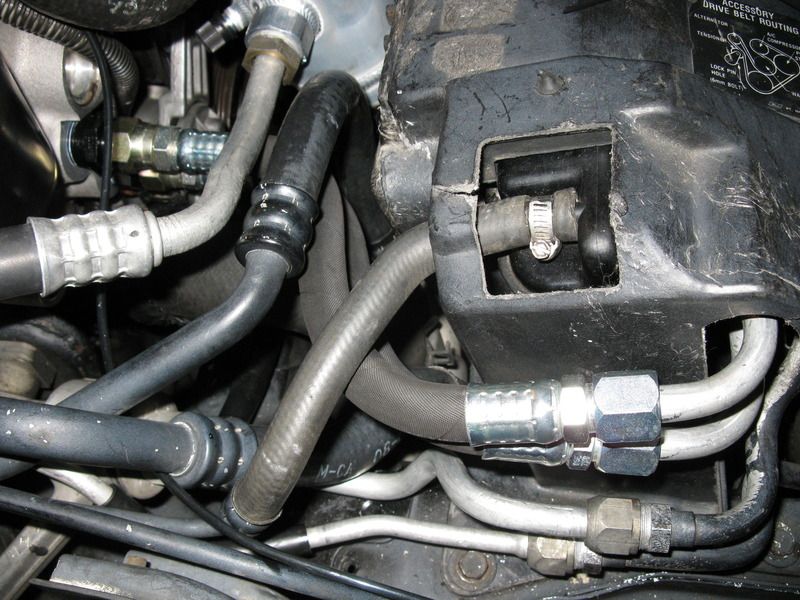 And now, after over two years of being separate from the engine, it's time for one of the most recognizable parts of the LT5 to go back on. Drum roll, please... 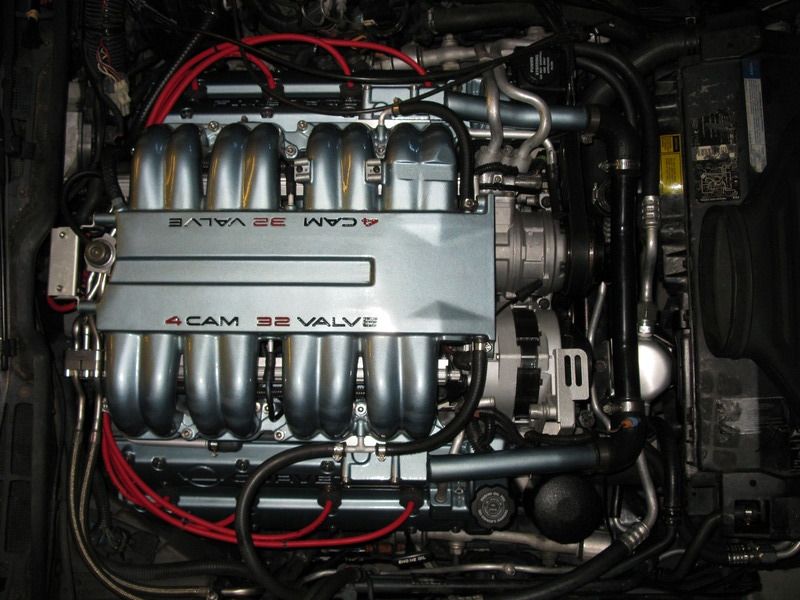 Getting close now!! 
__________________
[IMG]http://i13.photobucket.com/albums/a292/bdw18_123/_zr1netforumsigphoto.jpg[/IMG][B] 1990 Corvette ZR-1 [/B][I] White/Flame Red, #2299, mostly stock, 144K miles.[/I] -Cams timed to the '93-'95 405HP LT5 stock timing. -IAT sensor relocated to below front bumper. -Haibeck hoops installed in airduct. -OBX cat-back exhaust. [COLOR=DarkRed][B](SOLD - December 2012 [/B][/COLOR][COLOR=DarkRed][B]:hello:)[/B][/COLOR] 1993 Corvette Coupe Black/Black, 6-speed (SOLD - October 2009 :hello:) Last edited by bdw18_123; 08-28-2011 at 10:26 PM. |
|
|
|
|
08-28-2011
|
#136 |
|
Join Date: Apr 2009
Location: Prather, CA
Posts: 809
|
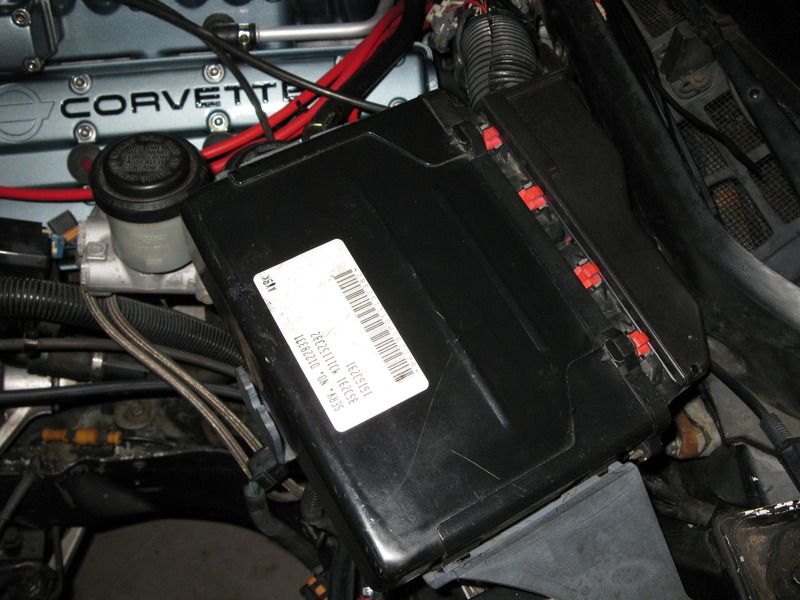
I bought a used ECM wire cover for $15 that the later ZR-1's have, the '90 version is hard to find and expensive when you do. I had to make a cut out on the bottom side to allow the cover to slide on completely, due to how the '90 ECM wire harness is routed. I like the look of the later style cover better anyway.
 Console cover, shifter boot & knob installed. I cleaned the leather boot with leather cleaner, and it actually still looks pretty decent considering it is the original one and has 140K of shifting on it! I also polished the exposed part of the metal shifter rod that the reverse lockout ring rides on. I thought about painting it, but decided against it as the lockout ring would rub the paint off eventually. The cupholder cover is a little scratched up, but that is a project for another day. I just want to get this car running! 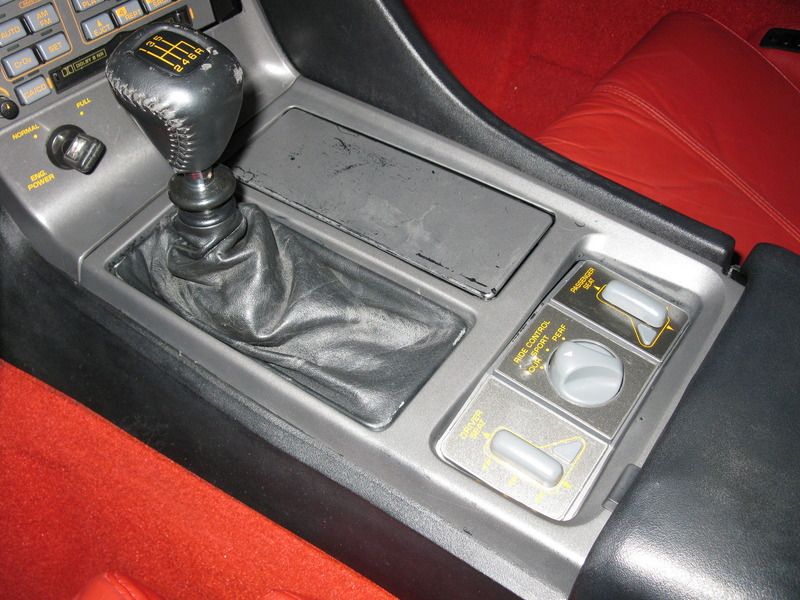 Well, that's it for now, I'm going to spend the rest of the day working on this project. Hopefully my next update will headline with this: "The Beast Lives!!"
__________________
[IMG]http://i13.photobucket.com/albums/a292/bdw18_123/_zr1netforumsigphoto.jpg[/IMG][B] 1990 Corvette ZR-1 [/B][I] White/Flame Red, #2299, mostly stock, 144K miles.[/I] -Cams timed to the '93-'95 405HP LT5 stock timing. -IAT sensor relocated to below front bumper. -Haibeck hoops installed in airduct. -OBX cat-back exhaust. [COLOR=DarkRed][B](SOLD - December 2012 [/B][/COLOR][COLOR=DarkRed][B]:hello:)[/B][/COLOR] 1993 Corvette Coupe Black/Black, 6-speed (SOLD - October 2009 :hello:) Last edited by bdw18_123; 08-28-2011 at 10:02 PM. |
|
|
|
|
08-28-2011
|
#137 |
 Join Date: Jul 2007
Location: Bartlett, IL
Posts: 7,140
|
I like the color you picked for the motor parts
__________________
1990 Corvette ZR-1 #1051 Watson Headers (2" Primary) - Borla Catback Late Model IH - Plenum Coilovers - 4.10s Custom Interior NCM Lifetime Member #978 |
|
|
|
|
08-28-2011
|
#138 |
|
Join Date: Mar 2007
Location: Crystal Lake, IL
Posts: 7,194
|
Is that titanium blue?
__________________
LGAFF 90 #966-150K miles-sold 92 #234-sold 1987 Callaway TT #17 1991 ZR-1 #1359 |
|
|
|
|
08-28-2011
|
#139 |
|
Join Date: Mar 2007
Location: Crystal Lake, IL
Posts: 7,194
|
Guess I need to read.....I almost bought that, it looks close to the OEM color on the cap if it were flatter, alittle bluer than I imagined
__________________
LGAFF 90 #966-150K miles-sold 92 #234-sold 1987 Callaway TT #17 1991 ZR-1 #1359 |
|
|
|
|
08-28-2011
|
#140 | |
|
Join Date: Apr 2009
Location: Prather, CA
Posts: 809
|
Quote:
__________________
[IMG]http://i13.photobucket.com/albums/a292/bdw18_123/_zr1netforumsigphoto.jpg[/IMG][B] 1990 Corvette ZR-1 [/B][I] White/Flame Red, #2299, mostly stock, 144K miles.[/I] -Cams timed to the '93-'95 405HP LT5 stock timing. -IAT sensor relocated to below front bumper. -Haibeck hoops installed in airduct. -OBX cat-back exhaust. [COLOR=DarkRed][B](SOLD - December 2012 [/B][/COLOR][COLOR=DarkRed][B]:hello:)[/B][/COLOR] 1993 Corvette Coupe Black/Black, 6-speed (SOLD - October 2009 :hello:) |
|
|
|
|
 |
|
|


 Linear Mode

