
|
 04-09-2012
|
#301 | |
  Join Date: May 2007
Location: Peoria, AZ
Posts: 9,120
|
Quote:
Very nice find Andrew!!! Any photos of these areas?
__________________
GOLDCYLON - 91 ZR-1 #2014 GOLDCYLON - 90 ZR-1 #2794, 4L60e (Formerly Schrade's) GOLDCYLON - 11 CTS-V Arizona State Director  91 WHITE/BLACK #2014. 380 P&P&PCed,Ported Heads, Jeal Long tubes, Corsa Exhaust/FIKSE FM-5s /LED TLs, LED Headlights, Front Wilwood 6 piston narrowlite calipers and rear Wilwood caliper street shop mod,CNCed Coolant Pipes,TPI Cvr,Filter cover,Stainless Bolts, DRM/DOM PROM /ZFDOC mod build #102,DRLs,BMAD with stainless Debris Screen,Coplan Air Blaster, Pioneer APP Radio 4,Brey-Krause HB,Sub Bar,Fire extinguisher seat mount,DRM Coilovers,LEDs everywhere,Compass mirror (orange),V1 DIC hidden display, Homelink sun visor, Carbon Fiber top x3 and APSIS Carbon Fiber interior, APSIS CF Steering Wheel/NAPA Leather, Banski trailing arms, Guldstrand front suspension,urethane bushings from Prothane (total suspension) ZFDoc drive shaft safety loop, raptor shift light (orange),AO engineering louver front plate, Console seat cushion, 96CE seats with black custom Sheepskins, ss billet catch can,Viper remote entry/alarm,Cragar Rear Louvers,LED side louver lights, Dewitts Radiator with SPAL fans and a Woods 160 T-Stat 90 RED/BLACK #2794. 4L60e Automatic Stage V by RPM Transmission, TCI Dedicated TCM, OBX Stainless Headers, Corsa Exhaust, SAN Secondaries and Haibeck PROM, Exotic Muscle Coil overs, LED Interior Lights, LED Tail Lights, LED Headlights, 94 Sport seats with black custom Sheepskins , Cragar rear louvers, GS Front calipers, Banski Trailing arms, APSIS Carbon Fiber steering wheel, Front and Rear Baer Eradispeeds, DRLs, Guldstrand front suspension,urethane bushings from Prothane (total suspension), Dewitt's Raditor with Dual SPAL fans and a Haibeck 170 T-Stat 11 RED/GREY CTS-V |
|

|

|
|
04-09-2012
|
#302 | |
|
Join Date: Mar 2009
Location: Orlando, FL
Posts: 1,816
|
Quote:
 The brake booster line is self-explanatory I think The brake booster line is self-explanatory I think 
|
|
|
|
|
|
04-09-2012
|
#303 | |
 Join Date: May 2011
Location: Sydney, Australia
Posts: 2,466
|
Quote:
|
|
|
|
|
|
04-09-2012
|
#304 | |
|
Join Date: Mar 2009
Location: Orlando, FL
Posts: 1,816
|
Quote:
|
|
|
|
|
|
04-10-2012
|
#305 |
  Join Date: Aug 2005
Location: Northridge, CA
Posts: 1,459
|

|
|
|
|
|
04-10-2012
|
#306 |

Join Date: Dec 2004
Location: Jacksonville, FL USA
Posts: 4,609
|
Andrew, that new head liner looks great! Nice work man!
Thanks for the tips on the install too! Tom
__________________
1990 ZR-1, Black/grey, #2233, stock. ZR-1 Net Reg Founding Member #316 & NCM member |
|
|
|
|
04-19-2012
|
#307 |
|
Join Date: Mar 2009
Location: Orlando, FL
Posts: 1,816
|
Thanks for the comments, guys!
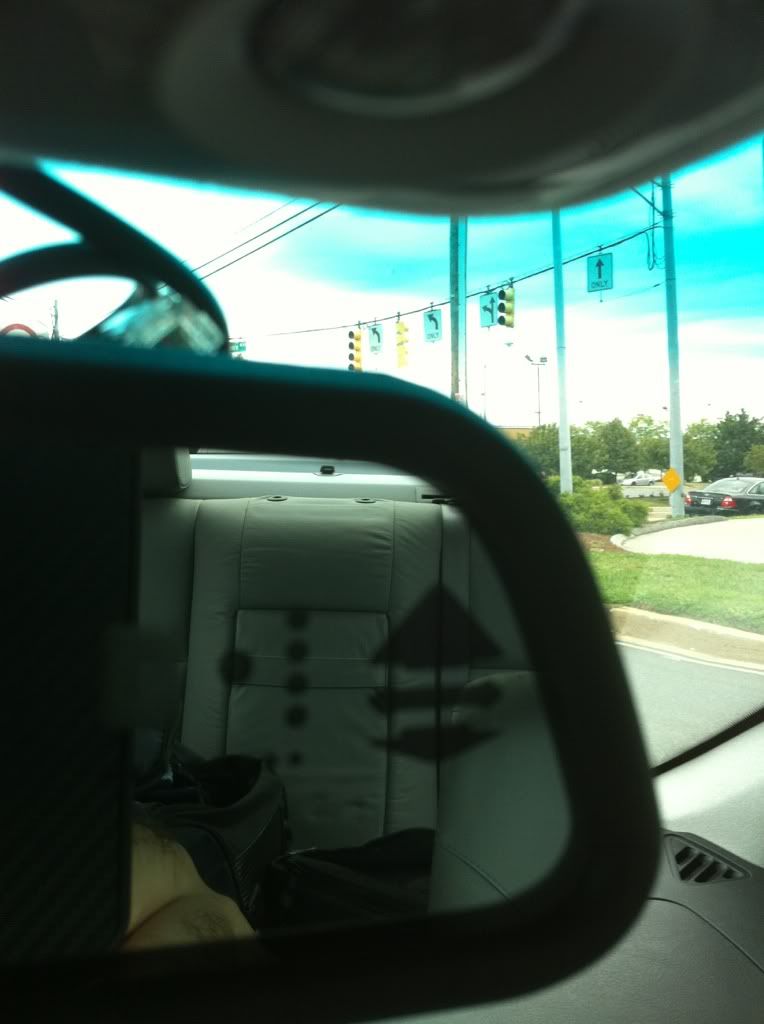
I decided to revise the installation of the concealed V1 unit today. I think it looked a little cobbled together before. Here's what I came up with today:  A little more hidden, fit and finish is a little better. Of course, now the DIC cover plate with the ZR-1 logo is basically junk, but, it was a learning experience
|
|
|
|
|
04-19-2012
|
#308 | |
|
Join Date: May 2007
Location: Peoria, AZ
Posts: 9,120
|
Quote:
If nothing me next lol I have a spare DIC and a conceal unit to modify
__________________
GOLDCYLON - 91 ZR-1 #2014 GOLDCYLON - 90 ZR-1 #2794, 4L60e (Formerly Schrade's) GOLDCYLON - 11 CTS-V Arizona State Director 91 WHITE/BLACK #2014. 380 P&P&PCed,Ported Heads, Jeal Long tubes, Corsa Exhaust/FIKSE FM-5s /LED TLs, LED Headlights, Front Wilwood 6 piston narrowlite calipers and rear Wilwood caliper street shop mod,CNCed Coolant Pipes,TPI Cvr,Filter cover,Stainless Bolts, DRM/DOM PROM /ZFDOC mod build #102,DRLs,BMAD with stainless Debris Screen,Coplan Air Blaster, Pioneer APP Radio 4,Brey-Krause HB,Sub Bar,Fire extinguisher seat mount,DRM Coilovers,LEDs everywhere,Compass mirror (orange),V1 DIC hidden display, Homelink sun visor, Carbon Fiber top x3 and APSIS Carbon Fiber interior, APSIS CF Steering Wheel/NAPA Leather, Banski trailing arms, Guldstrand front suspension,urethane bushings from Prothane (total suspension) ZFDoc drive shaft safety loop, raptor shift light (orange),AO engineering louver front plate, Console seat cushion, 96CE seats with black custom Sheepskins, ss billet catch can,Viper remote entry/alarm,Cragar Rear Louvers,LED side louver lights, Dewitts Radiator with SPAL fans and a Woods 160 T-Stat 90 RED/BLACK #2794. 4L60e Automatic Stage V by RPM Transmission, TCI Dedicated TCM, OBX Stainless Headers, Corsa Exhaust, SAN Secondaries and Haibeck PROM, Exotic Muscle Coil overs, LED Interior Lights, LED Tail Lights, LED Headlights, 94 Sport seats with black custom Sheepskins , Cragar rear louvers, GS Front calipers, Banski Trailing arms, APSIS Carbon Fiber steering wheel, Front and Rear Baer Eradispeeds, DRLs, Guldstrand front suspension,urethane bushings from Prothane (total suspension), Dewitt's Raditor with Dual SPAL fans and a Haibeck 170 T-Stat 11 RED/GREY CTS-V |
|
|
|
|
|
04-19-2012
|
#309 | |
|
Join Date: Mar 2009
Location: Orlando, FL
Posts: 1,816
|
Quote:
I went to Office Depot and bought an Avery "document holder", it's made of translucent textured plastic, smoke colored, and about the same thickness as the stock DIC lens. This was cut to the same size as the original DIC lens. I also had Office Depot print up a transparency sheet (like used for presentations with an overhead projector), but all that was printed was a dark gray solid background color. This in effect created a thin dark-tinted plastic sheet. This lies over the stock DIC cover, then the thicker textured plastic goes on top of that. This arrangement allows the driver to see the stock warning lights, and the V1 display, but prevents discerning that there's anything behind the lens that doesn't belong there I used a hot knife attachment for my soldering gun, to melt away the white plastic of the DIC light compartments. It looks like an eggcrate, you need to remove the 'ribs' between the compartments to allow the concealed display to fit. This arrangement requires that you remove the circuit board from the V1 display housing. I hacked up the front-most black plastic part of the V1 display, and epoxied the individual sections (directional arrows, other LED surrounds), to the circuit board. I cut the hole for the button, using a razor blade and a lot of patience. There's a lot of trial and error fitment needed. I fudged the final result with some black butyl windshield sealer rope, to help prevent light leakage from the cut sections of the DIC into the area around the V1 display. I didn't take pics because frankly, it looked terrible until the cover was back in place -Andrew |
|
|
|
|
|
04-19-2012
|
#310 | |
|
Join Date: May 2007
Location: Peoria, AZ
Posts: 9,120
|
Quote:
Just called ya. So does this block the LWPTS section? Yep?
__________________
GOLDCYLON - 91 ZR-1 #2014 GOLDCYLON - 90 ZR-1 #2794, 4L60e (Formerly Schrade's) GOLDCYLON - 11 CTS-V Arizona State Director 91 WHITE/BLACK #2014. 380 P&P&PCed,Ported Heads, Jeal Long tubes, Corsa Exhaust/FIKSE FM-5s /LED TLs, LED Headlights, Front Wilwood 6 piston narrowlite calipers and rear Wilwood caliper street shop mod,CNCed Coolant Pipes,TPI Cvr,Filter cover,Stainless Bolts, DRM/DOM PROM /ZFDOC mod build #102,DRLs,BMAD with stainless Debris Screen,Coplan Air Blaster, Pioneer APP Radio 4,Brey-Krause HB,Sub Bar,Fire extinguisher seat mount,DRM Coilovers,LEDs everywhere,Compass mirror (orange),V1 DIC hidden display, Homelink sun visor, Carbon Fiber top x3 and APSIS Carbon Fiber interior, APSIS CF Steering Wheel/NAPA Leather, Banski trailing arms, Guldstrand front suspension,urethane bushings from Prothane (total suspension) ZFDoc drive shaft safety loop, raptor shift light (orange),AO engineering louver front plate, Console seat cushion, 96CE seats with black custom Sheepskins, ss billet catch can,Viper remote entry/alarm,Cragar Rear Louvers,LED side louver lights, Dewitts Radiator with SPAL fans and a Woods 160 T-Stat 90 RED/BLACK #2794. 4L60e Automatic Stage V by RPM Transmission, TCI Dedicated TCM, OBX Stainless Headers, Corsa Exhaust, SAN Secondaries and Haibeck PROM, Exotic Muscle Coil overs, LED Interior Lights, LED Tail Lights, LED Headlights, 94 Sport seats with black custom Sheepskins , Cragar rear louvers, GS Front calipers, Banski Trailing arms, APSIS Carbon Fiber steering wheel, Front and Rear Baer Eradispeeds, DRLs, Guldstrand front suspension,urethane bushings from Prothane (total suspension), Dewitt's Raditor with Dual SPAL fans and a Haibeck 170 T-Stat 11 RED/GREY CTS-V Last edited by GOLDCYLON; 04-19-2012 at 02:46 PM. |
|
|
|
|
 |
|
|


 Linear Mode

